Write and Publish a Tutorial!
Do you have good notes or papers written by you and seeking for a
platform to publish? We provide the platform to publish your tutorials
in your name. If you wish to publish your tutorial in your name to
help the readers, Please contact us by sending an email to
publish@tools4testing.com or publish@java4coding.com The main way that
others learn about your work is through your published tutorials. If
you don’t publish, it will be as if you never did the work. Your notes
can help the readers only when you share it.
Spring Boot Security Auto-Configuration
The main objective of working on this example is to observe the behavior of the default configuration that comes with Spring Boot Security. Additionally, we aim to comprehend the components included in this default configuration and their respective purposes. This project employs HTTP Basic for authenticating and authorizing the user for an endpoint. The application exposes a REST endpoint at a specified path (/demo). In the case of a successful call, the response includes an HTTP 200 status message and a body. This example illustrates how the authentication and authorization are configured by default with Spring Security.
pom.xml<?xml version="1.0" encoding="UTF-8"?>
<project xmlns="https://maven.apache.org/POM/4.0.0" xmlns:xsi="https://www.w3.org/2001/XMLSchema-instance"
xsi:schemaLocation="https://maven.apache.org/POM/4.0.0 https://maven.apache.org/xsd/maven-4.0.0.xsd">
<modelVersion>4.0.0</modelVersion>
<parent>
<groupId>org.springframework.boot</groupId>
<artifactId>spring-boot-starter-parent</artifactId>
<version>2.6.0</version>
<relativePath/> <!-- lookup parent from repository, not local -->
</parent>
<groupId>com.example</groupId>
<artifactId>SpringBootSecurityAutoConfiguration</artifactId>
<version>0.0.1-SNAPSHOT</version>
<name>SpringBootSecurityAutoConfiguration</name>
<description>Spring Boot Security Auto-Configuration</description>
<properties>
<java.version>11</java.version>
<project.build.sourceEncoding>UTF-8</project.build.sourceEncoding>
<project.reporting.outputEncoding>UTF-8</project.reporting.outputEncoding>
<spring-boot.version>2.6.0</spring-boot.version>
</properties>
<dependencies>
<dependency>
<groupId>org.springframework.boot</groupId>
<artifactId>spring-boot-starter</artifactId>
</dependency>
<dependency>
<groupId>org.springframework.boot</groupId>
<artifactId>spring-boot-starter-web</artifactId>
</dependency>
<dependency>
<groupId>org.springframework.boot</groupId>
<artifactId>spring-boot-starter-security</artifactId>
</dependency>
</dependencies>
<dependencyManagement>
<dependencies>
<dependency>
<groupId>org.springframework.boot</groupId>
<artifactId>spring-boot-dependencies</artifactId>
<version>${spring-boot.version}</version>
<type>pom</type>
<scope>import</scope>
</dependency>
</dependencies>
</dependencyManagement>
<build>
<plugins>
<plugin>
<groupId>org.springframework.boot</groupId>
<artifactId>spring-boot-maven-plugin</artifactId>
<version>${spring-boot.version}</version>
<executions>
<execution>
<id>build-info</id>
<goals>
<goal>build-info</goal>
<goal>repackage</goal>
</goals>
</execution>
</executions>
</plugin>
</plugins>
</build>
</project> |
DemoController.javapackage com.java4coding;
import org.springframework.web.bind.annotation.GetMapping;
import org.springframework.web.bind.annotation.RestController;
@RestController
public class DemoController {
@GetMapping(value = "/hello")
public String sayHello() {
return "Hello";
}
} |
SpringBootSecurityAutoConfigurationDemo.javapackage com.java4coding;
import org.springframework.boot.SpringApplication;
import org.springframework.boot.autoconfigure.SpringBootApplication;
@SpringBootApplication
public class SpringBootSecurityAutoConfigurationDemo {
public static void main(String[] args) {
SpringApplication.run(SpringBootSecurityAutoConfigurationDemo.class, args);
}
} |
When running this application, a generated security password should be displayed in the console. Each time the application is executed, a new password is generated and printed in the console. To access the endpoint, you need to use this password in the Authorization header.
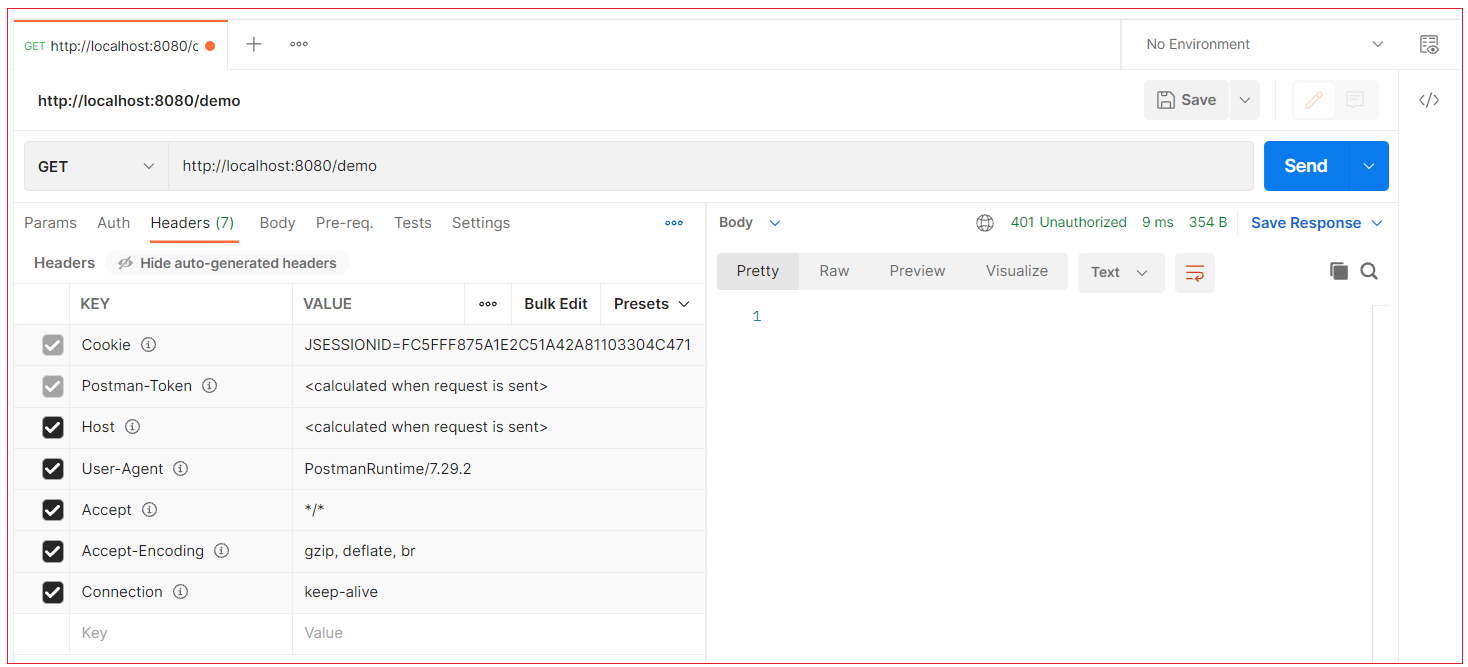
Let's attempt to call the endpoint without adding the Authorization header from Postman.
When the endpoint is invoked through the curl command (curl -u https://localhost:8080/demo), we observe that no response is received.
By default, Spring Security expects the default username (user) with the default password printed in console. Let’s try to call the endpoint by setting username (user) and password (printed in console) with -u flag in curl command.
curl -u user:13072da5-d5fa-4cdb-87a5-e796cfe6339a https://localhost:8080/demo
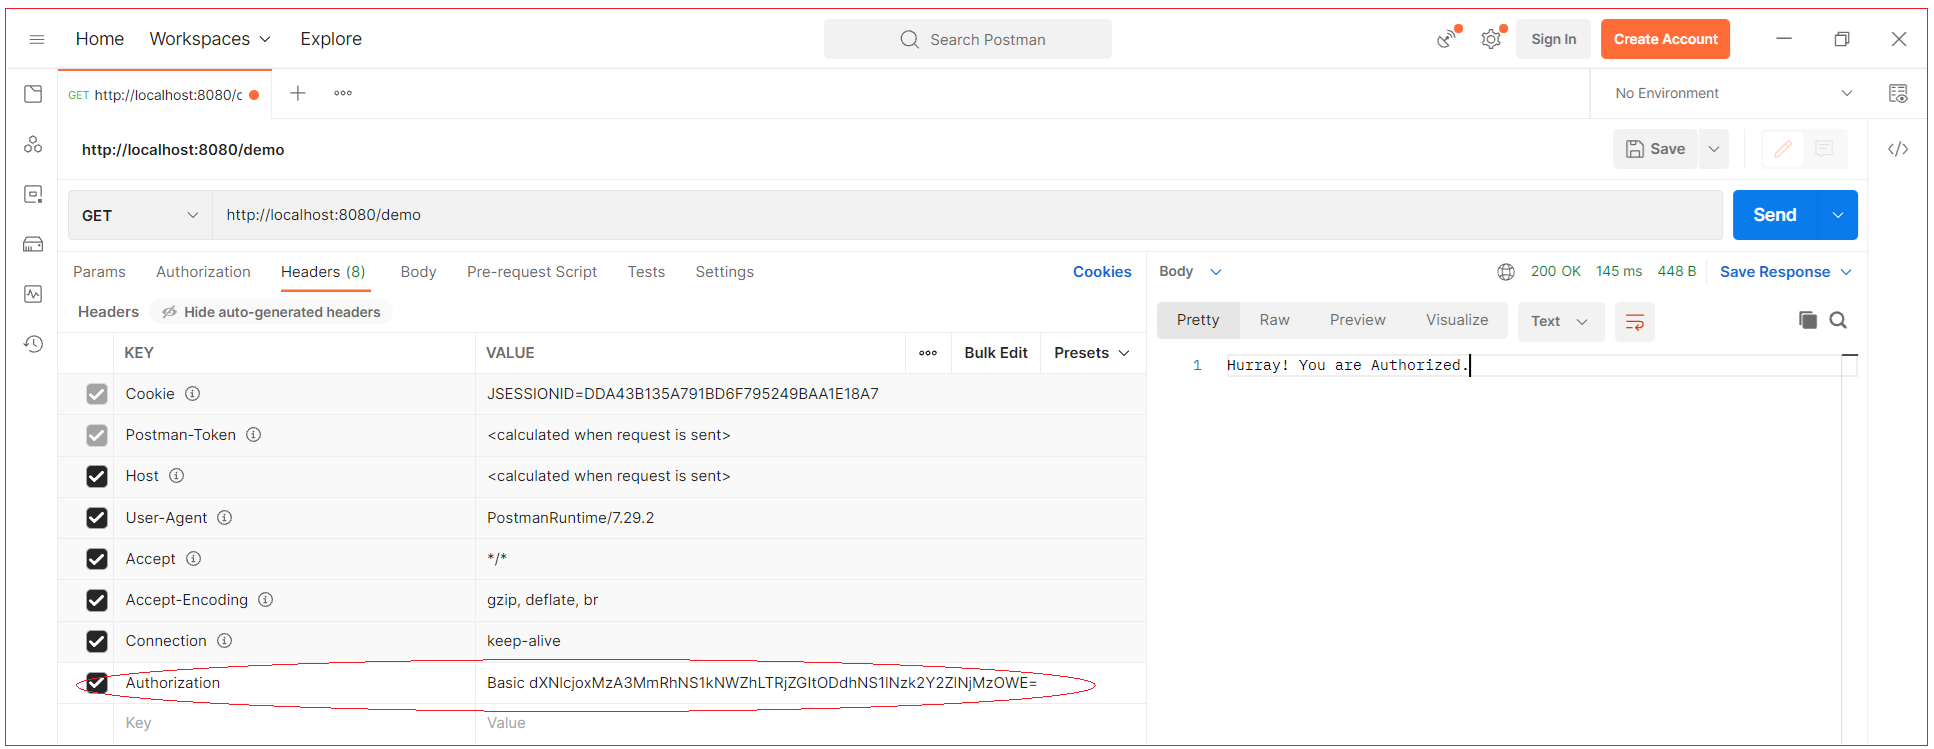
When the curl command is executed with a username and password through the -u flag, behind the scenes, curl encodes the string <username>:<password> in Base64. Subsequently, it sends this encoded string as the value of the Authorization header, prefixed with the string "Basic". To call the endpoint through postman you have to form value for Authorization header. You achieve this by employing the Base64 tool in a Linux console. Alternatively, you can utilize an online tool such as https://www.base64encode.org to encode strings in Base64. The following snippet demonstrates the command in either a Linux or Git Bash console:
echo -n user:13072da5-d5fa-4cdb-87a5-e796cfe6339a | base64
Executing this command yields the Base64-encoded string: dXNlcjoxMzA3MmRhNS1kNWZhLTRjZGItODdhNS1lNzk2Y2ZlNjMzOWE=
You can now use this Base64-encoded value as the Authorization header for the call. This call should produce the same result as the one using the -u option:
curl -H "Authorization: Basic dXNlcjoxMzA3MmRhNS1kNWZhLTRjZGItODdhNS1lNzk2Y2ZlNjMzOWE=" https://localhost:8080/demo
The result of the call is:


