Write and Publish a Tutorial!
Do you have good notes or papers written by you and seeking for a
platform to publish? We provide the platform to publish your tutorials
in your name. If you wish to publish your tutorial in your name to
help the readers, Please contact us by sending an email to
publish@tools4testing.com or publish@java4coding.com The main way that
others learn about your work is through your published tutorials. If
you don’t publish, it will be as if you never did the work. Your notes
can help the readers only when you share it.
How to use AWS Java SDK to create an EC2 instance
AWS SDK is a programming framework designed to ease application creation using all major programming languages (Java, .NET, Python, and so on) and platforms (Android, iOS, and so on) from any major OS.
AWS also provides plugins or integrated development environment (IDE) toolkits which can be plugged into IDEs like Eclipse or Visual Studio IDE and can work with direct integration with an AWS account and all its resources.
In previous chapter we learnt to launch EC2 instance through AWS console, in this chapter let us see how we can do the same using AWS SDK directly from code. We will learn to use AWS Java SDK and API to create an EC2 instance, start and stop the instance, reboot it, back it up into an image, and restoring it from the backup.
Step 1: Create AWS accessKey and secretKey to connect from SDK to AWS
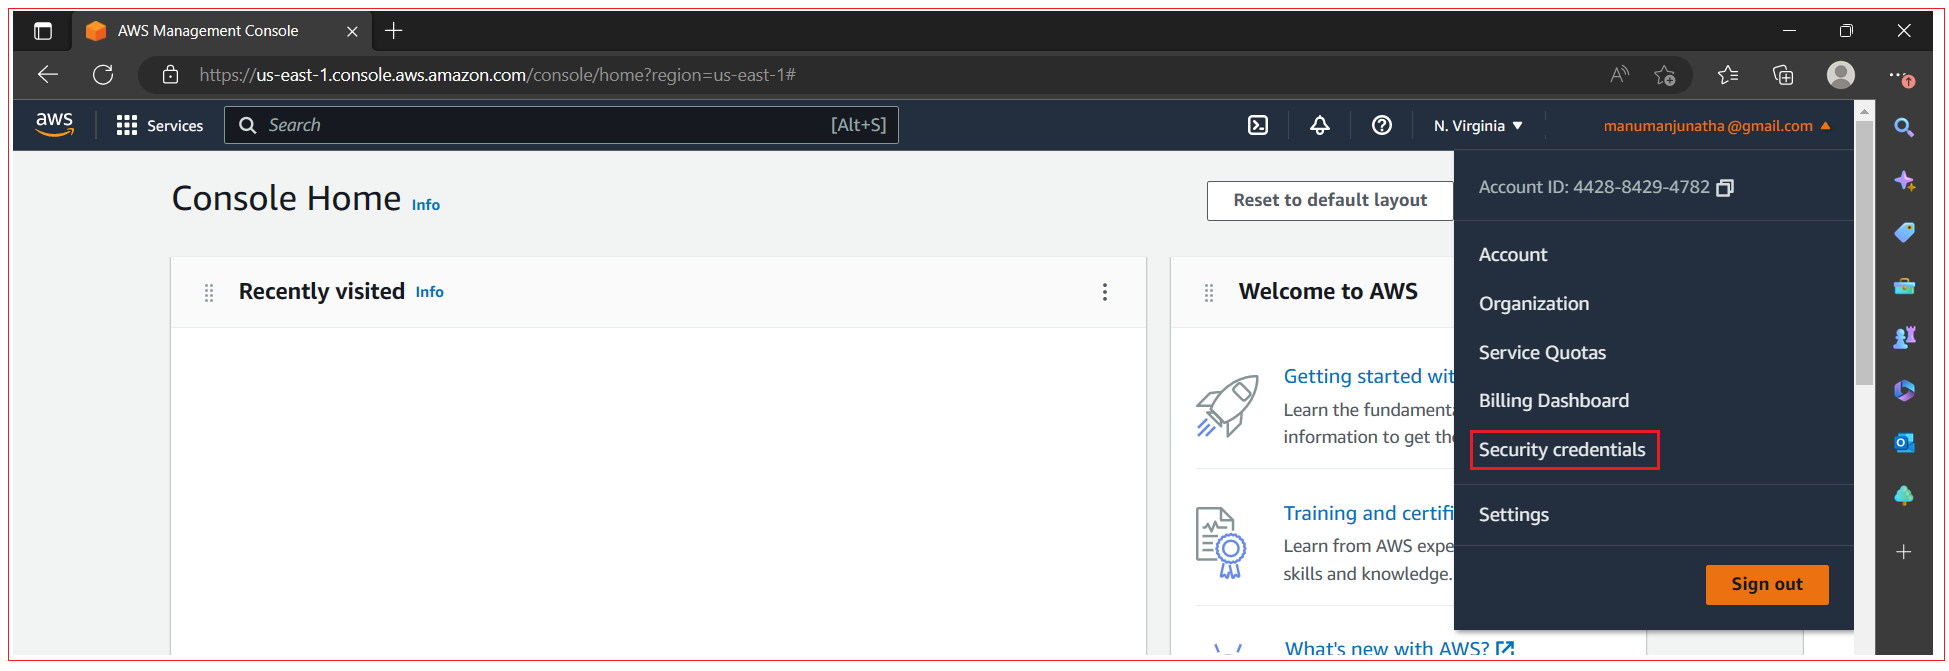
Click on your account and select Security Credentials.
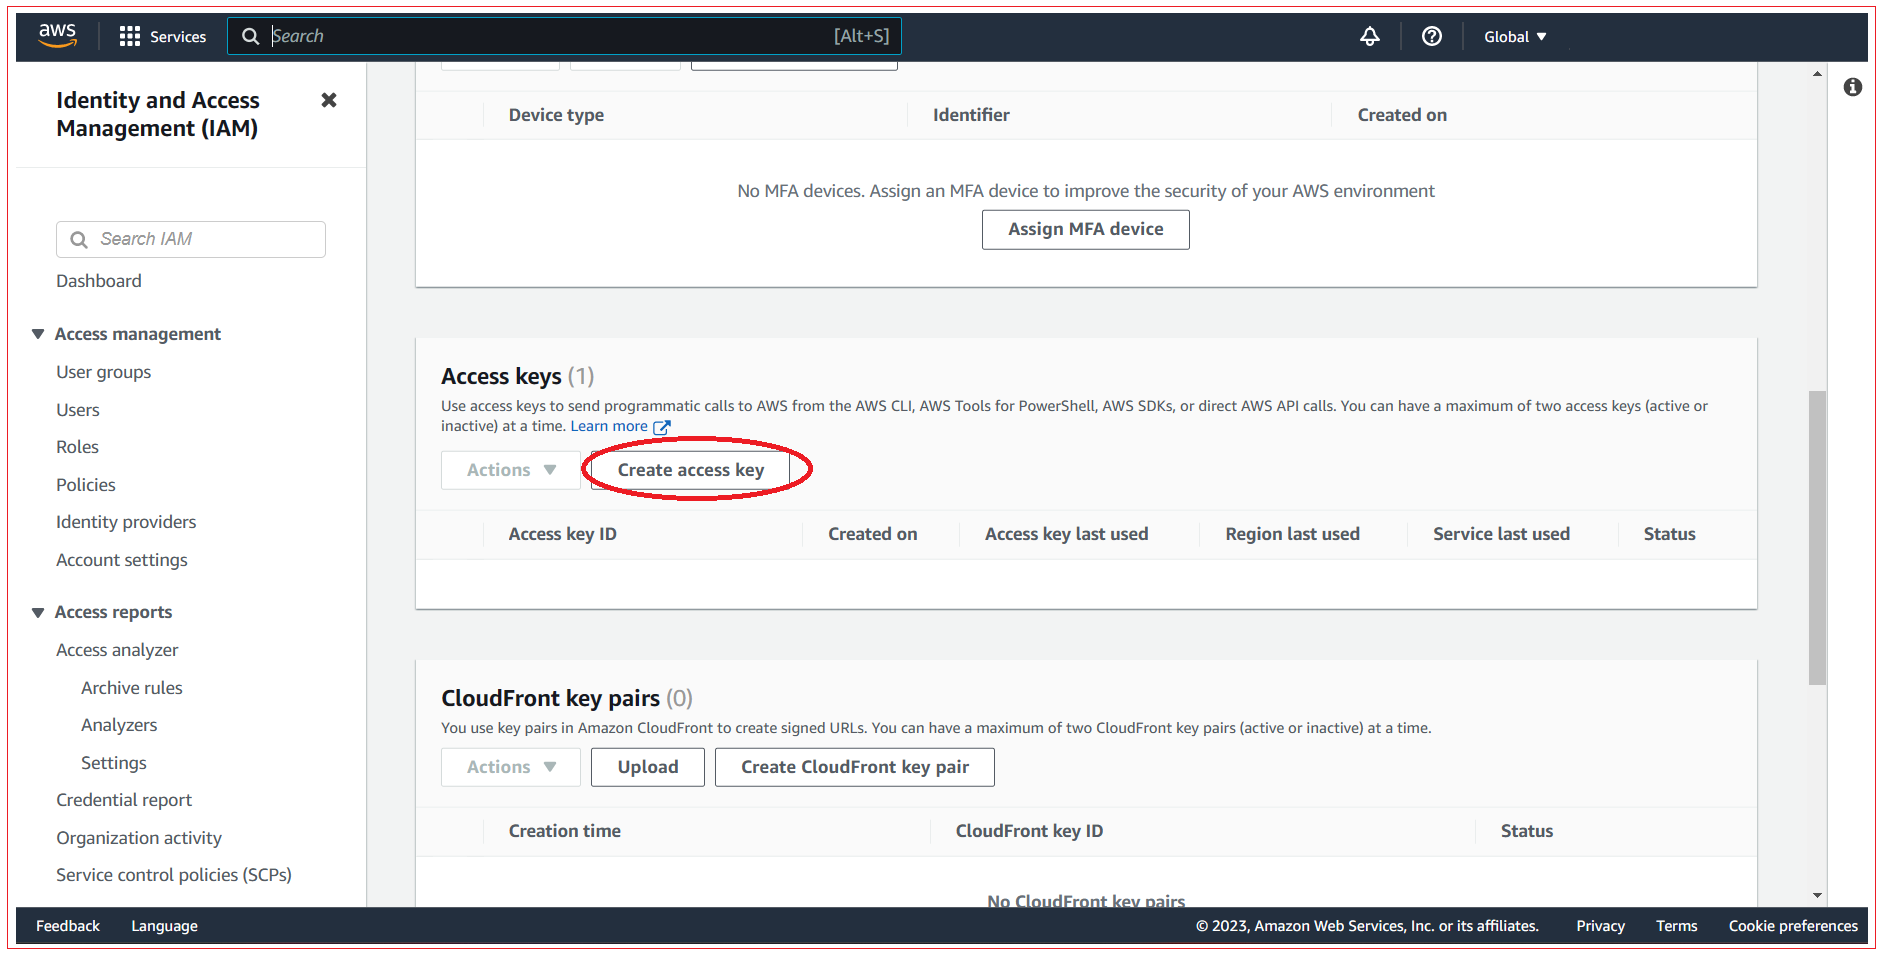
Scroll a bit down and Click on “Create access key”
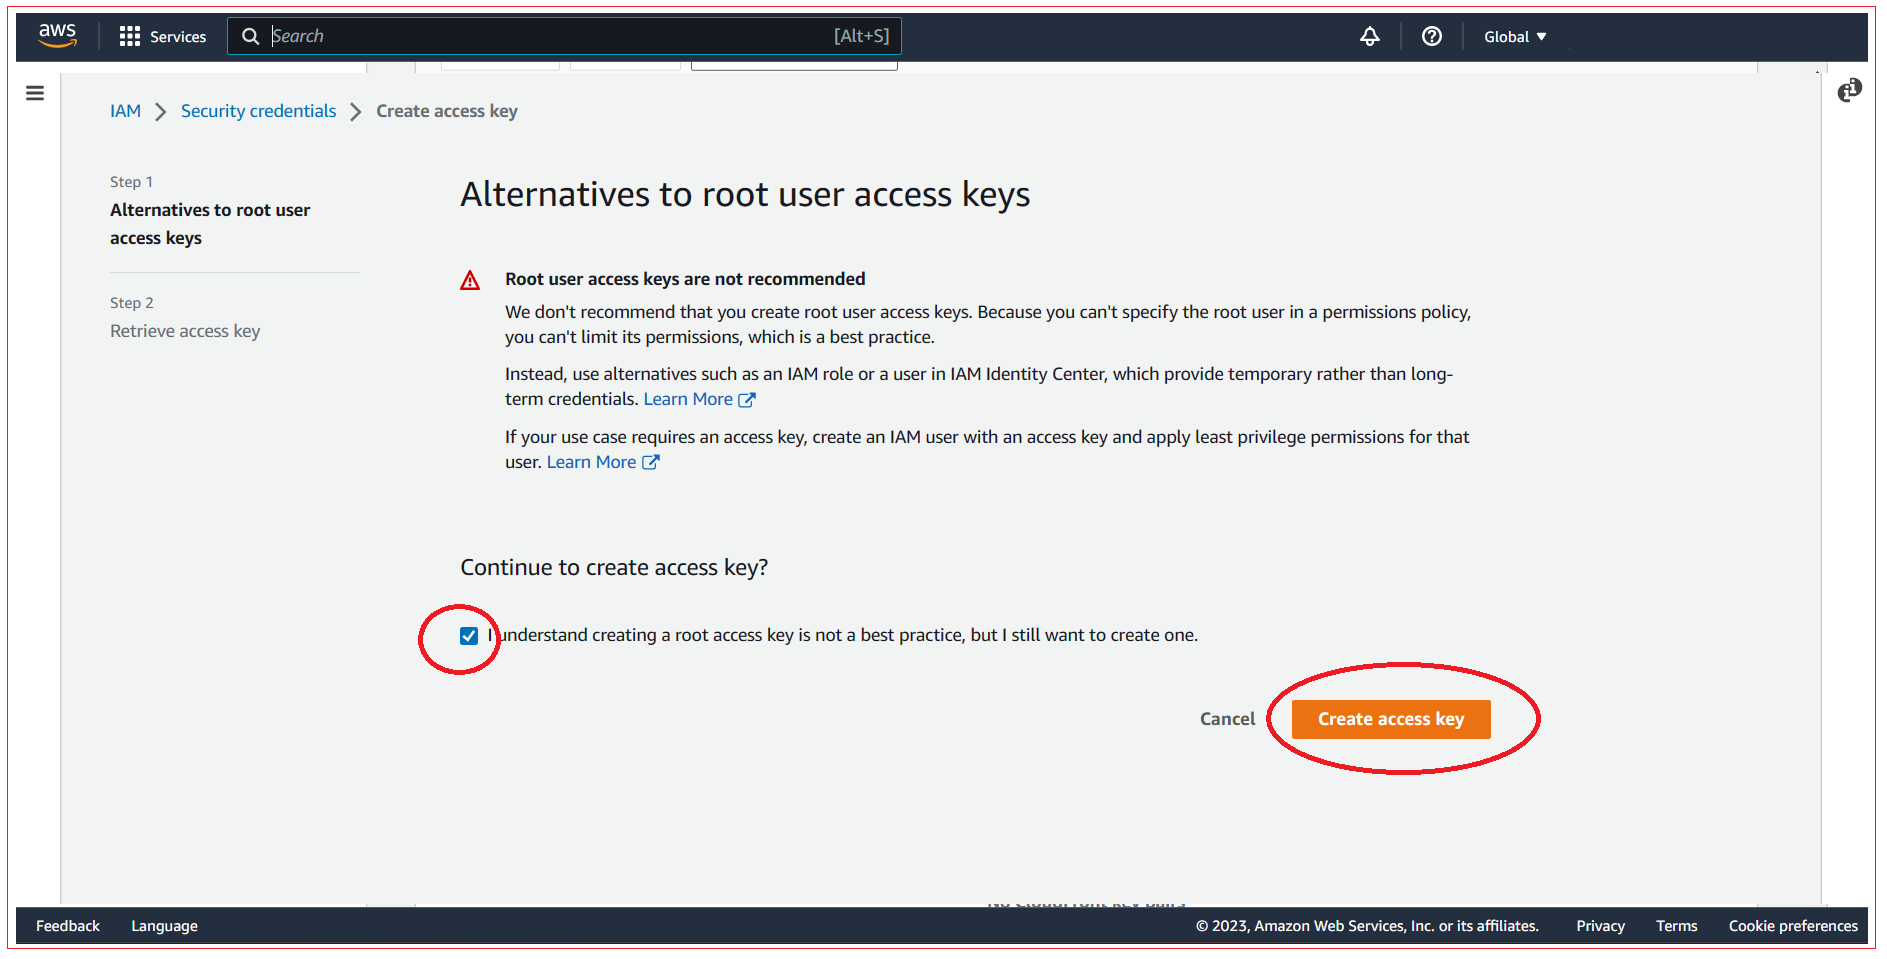
Select the consent check box and click on “Create access Key”
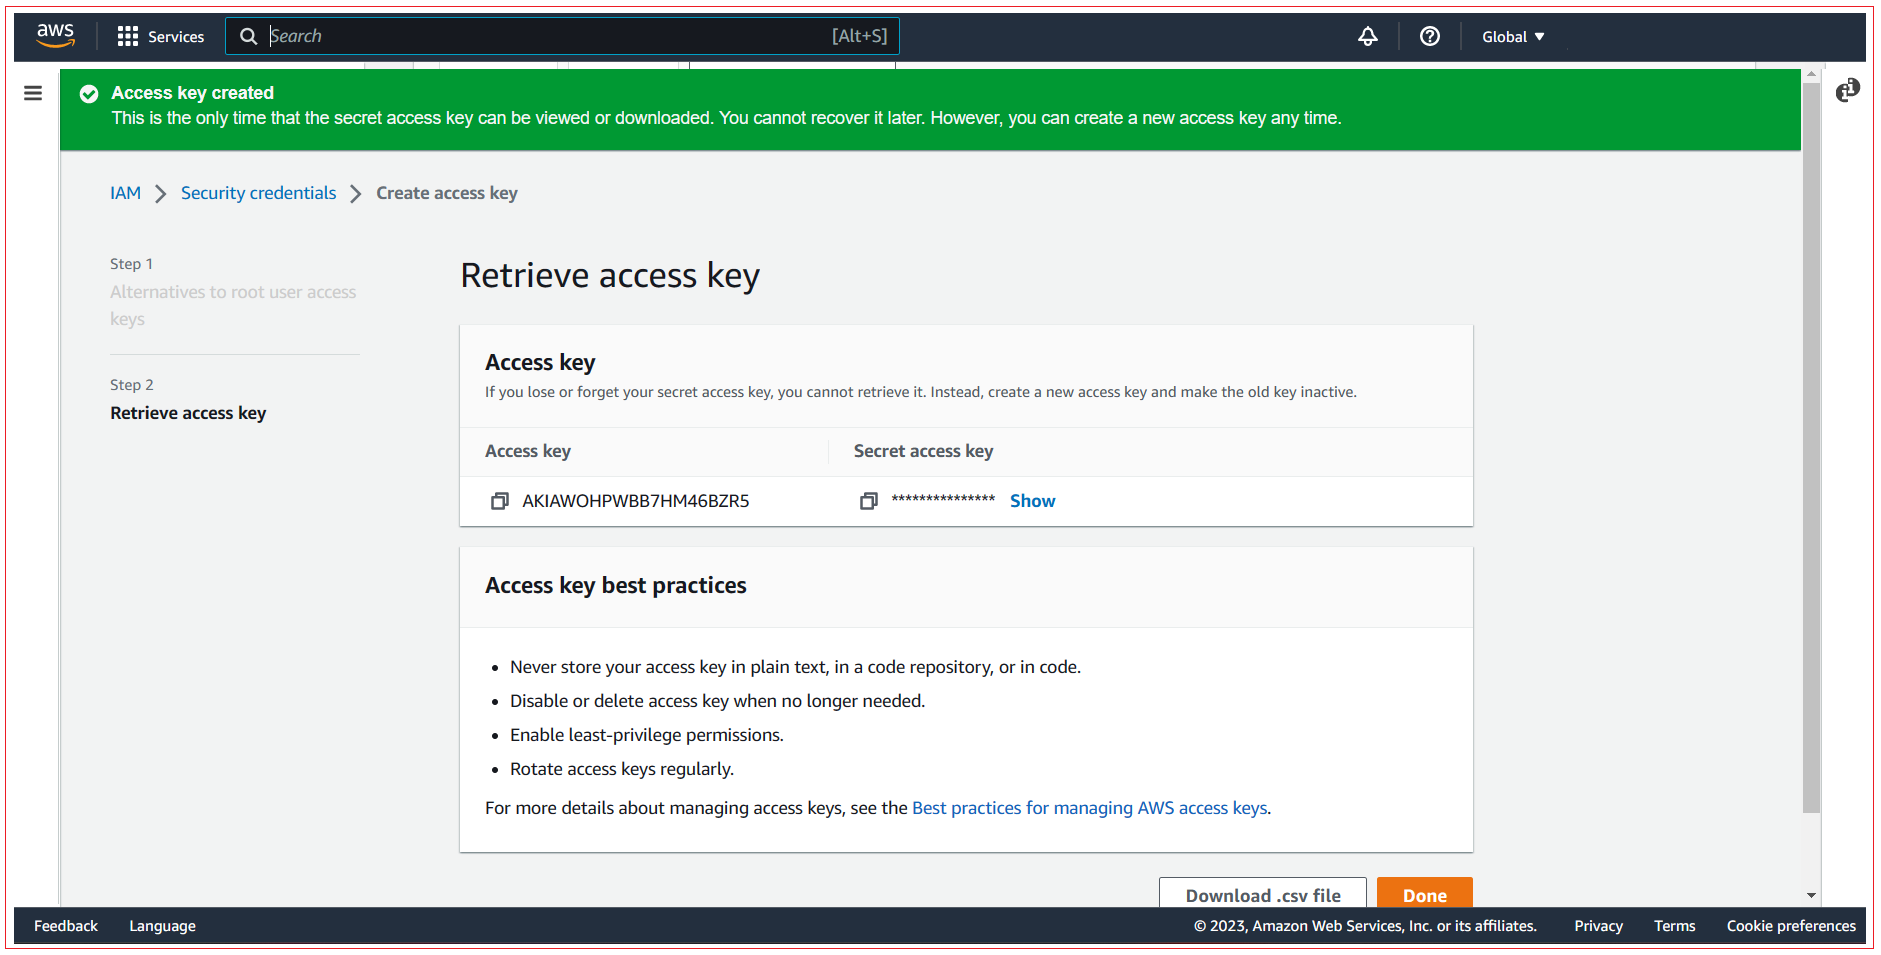
Once done, save the access key and secrete key in a secure place. The former serves the same function as a login name, and the latter acts like its password.
Step 2: Create java Project using Maven
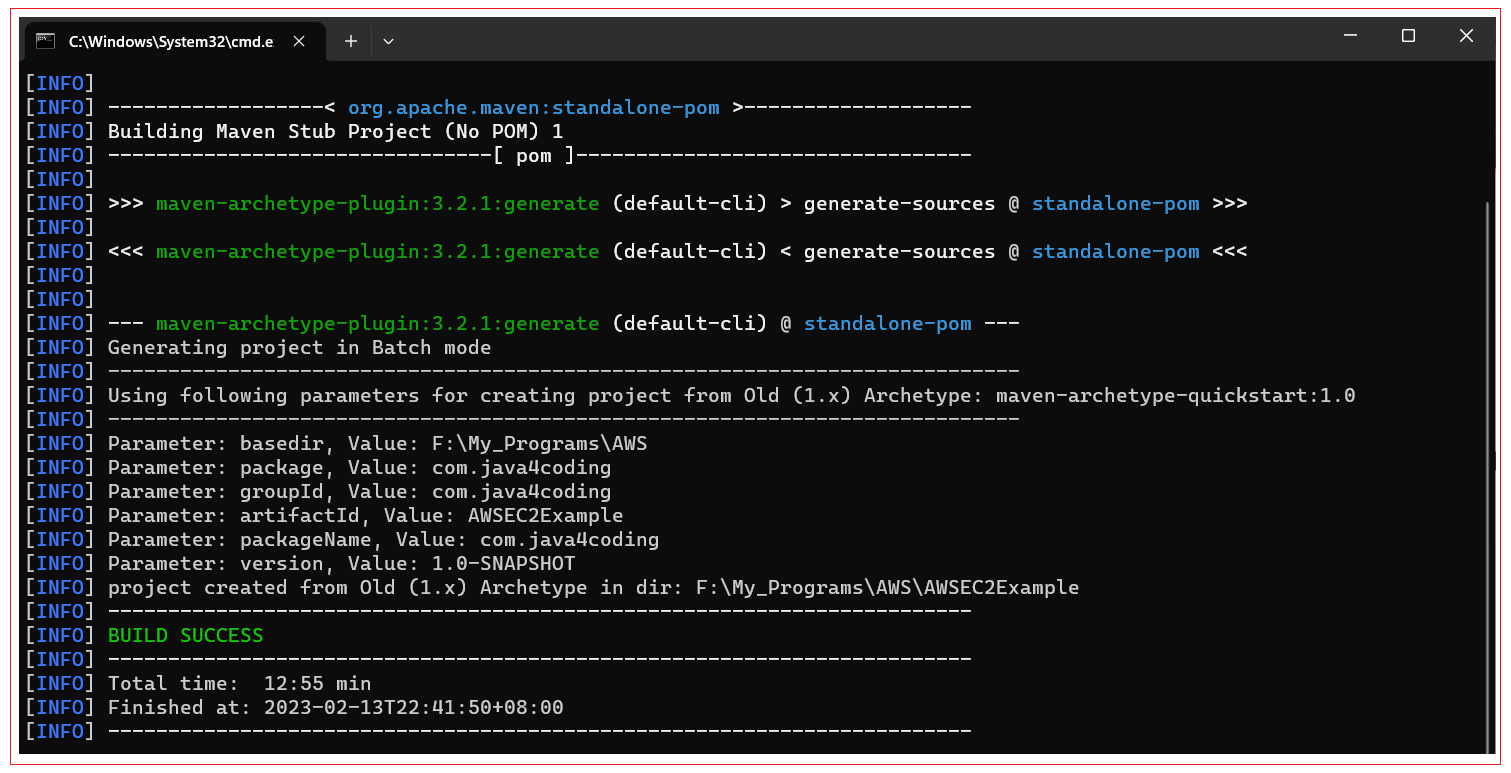
In the command prompt execute the following maven command to generate Maven supported Java project named as “AWSEC2Example”.
mvn archetype:generate -DgroupId=com.java4coding -DartifactId=AWSEC2Example -DarchetypeArtifactId=maven-archetype-quickstart -DinteractiveMode=false
This command creates a new maven Java project with the name “AWSEC2Example”, with complete directory structure.
Step 3: Import project into Intellij IDE
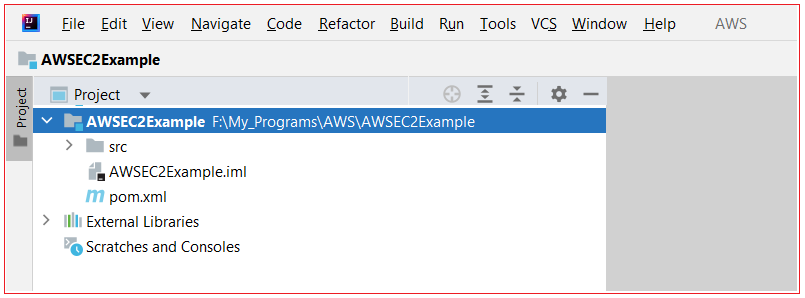
In Intellij IDE, Choose File –> New –> Module from Existing Sources –>Select pom.xml from newly created maven project, Click OK.
Step 4: Add dependencies in pom.xml
Add the maven parent, add the below AWS dependencies in pom.xml file.
pom.xml<project xmlns="https://maven.apache.org/POM/4.0.0" xmlns:xsi="https://www.w3.org/2001/XMLSchema-instance"
xsi:schemaLocation="https://maven.apache.org/POM/4.0.0 https://maven.apache.org/maven-v4_0_0.xsd">
<modelVersion>4.0.0</modelVersion>
<groupId>com.java4coding</groupId>
<artifactId>AWSEC2Example</artifactId>
<packaging>jar</packaging>
<version>1.0-SNAPSHOT</version>
<name>AWSEC2Example</name>
<url>https://maven.apache.org</url>
<dependencies>
<dependency>
<groupId>junit</groupId>
<artifactId>junit</artifactId>
<version>3.8.1</version>
<scope>test</scope>
</dependency>
<!-- https://mvnrepository.com/artifact/com.amazonaws/aws-java-sdk -->
<dependency>
<groupId>com.amazonaws</groupId>
<artifactId>aws-java-sdk</artifactId>
<version>1.12.395</version>
</dependency>
</dependencies>
</project> |
Step 5: Add AWS credentials to properties file
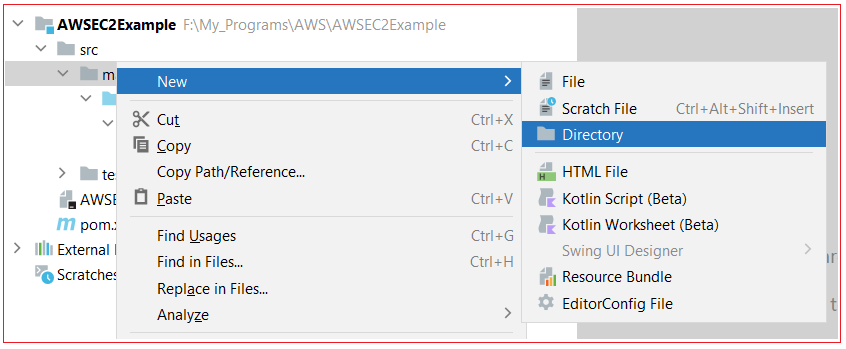
Right click on main folder and select New>Directory
Now you select resources and press Enter
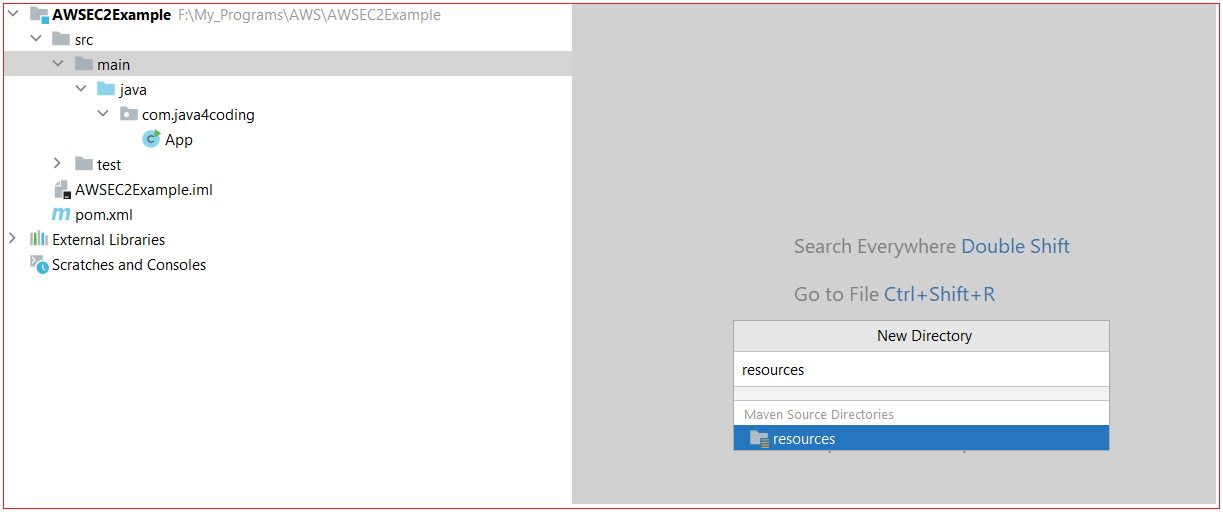
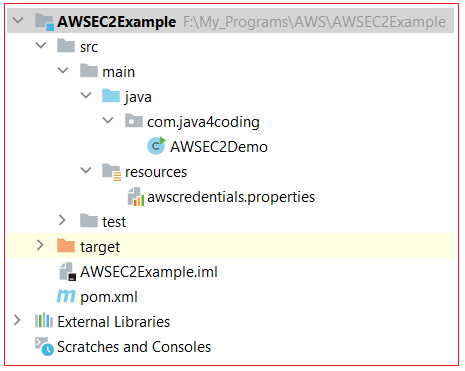
Now you create awscredentials.properties file inside resources directory and add below property values. Add the accessKey and secretKey value you create in step 1.
application.propertiesaccessKey=****************
secretKey=************************** |
Step 5: Create main class
Create a Java main class, in this class we are creating EC2 instance. EC2 instance has to be created with security group and key pair. We are creating security group and key pair and same we are using for EC2. When we create security group or key pair and if these does exists already we get exception, hence we are deleting them before creating. Also if the security group or key pair is used by any other EC2 instance we get exception while deleting security group or key pair. In such case you must delete the EC2 instance or unbind the security group and key pair from EC2 instance from AWS console.
AWSEC2Demo.java package com.java4coding;
import com.amazonaws.auth.*;
import com.amazonaws.regions.Regions;
import com.amazonaws.services.ec2.AmazonEC2;
import com.amazonaws.services.ec2.AmazonEC2Client;
import com.amazonaws.services.ec2.model.*;
import java.util.Arrays;
public class AWSEC2Demo {
public static void main(String[] args) {
System.out.println("---------------Started--------------");
//DefaultAWSCredentialsProviderChain credentialsProvider = new DefaultAWSCredentialsProviderChain();
AWSCredentialsProvider provider = new PropertiesFileCredentialsProvider(
"F:\\My_Programs\\AWS\\AWSEC2Example\\src\\main\\resources\\awscredentials.properties");
AmazonEC2 amazonEC2Client = AmazonEC2Client.builder()
.withRegion(Regions.US_WEST_2)
.withCredentials(provider)
.build();
// Delete security group if exists ------------------------------------
System.out.println("Deleting security group if exists--------------");
DeleteSecurityGroupRequest deleteSecurityGroupRequest = new DeleteSecurityGroupRequest();
deleteSecurityGroupRequest.withGroupName("JavaSecurityGroup");
amazonEC2Client.deleteSecurityGroup(deleteSecurityGroupRequest);
System.out.println("Deleting security group done--------------");
// Create security Group ------------------------------------
System.out.println("Creating security group--------------");
CreateSecurityGroupRequest csgr = new CreateSecurityGroupRequest();
csgr.withGroupName("JavaSecurityGroup").withDescription("My security group");
CreateSecurityGroupResult createSecurityGroupResult =
amazonEC2Client.createSecurityGroup(csgr);
IpPermission ipPermission =
new IpPermission();
IpRange ipRange1 = new IpRange().withCidrIp("111.111.111.111/32");
IpRange ipRange2 = new IpRange().withCidrIp("150.150.150.150/32");
ipPermission.withIpv4Ranges(Arrays.asList(new IpRange[]{ipRange1, ipRange2}))
.withIpProtocol("tcp")
.withFromPort(22)
.withToPort(22);
AuthorizeSecurityGroupIngressRequest authorizeSecurityGroupIngressRequest =
new AuthorizeSecurityGroupIngressRequest();
authorizeSecurityGroupIngressRequest.withGroupName("JavaSecurityGroup")
.withIpPermissions(ipPermission);
amazonEC2Client.authorizeSecurityGroupIngress(authorizeSecurityGroupIngressRequest);
System.out.println("Done creating security group--------------");
// Delete key pair if exists ------------------------------------
System.out.println("Deleting key pair if exists--------------");
DeleteKeyPairRequest deleteKeyPairRequest = new DeleteKeyPairRequest();
deleteKeyPairRequest.withKeyName("ec2keyName");
amazonEC2Client.deleteKeyPair(deleteKeyPairRequest);
System.out.println("Deleting key pair done--------------");
//Create a Key Pair----------------
System.out.println("Creating key pair done--------------");
CreateKeyPairRequest createKeyPairRequest = new CreateKeyPairRequest();
createKeyPairRequest.withKeyName("ec2keyName");
CreateKeyPairResult createKeyPairResult =
amazonEC2Client.createKeyPair(createKeyPairRequest);
KeyPair keyPair = new KeyPair();
keyPair = createKeyPairResult.getKeyPair();
String privateKey = keyPair.getKeyMaterial();
System.out.println("Done creating key pair--------------");
//Run an Amazon EC2 Instance------------
RunInstancesRequest runInstancesRequest =
new RunInstancesRequest();
runInstancesRequest.withImageId("ami-a9d09ed1")
.withInstanceType(InstanceType.T1Micro)
.withMinCount(1)
.withMaxCount(1)
.withKeyName("ec2keyName")
.withSecurityGroups("JavaSecurityGroup");
RunInstancesResult result = amazonEC2Client.runInstances(
runInstancesRequest);
System.out.println(result);
System.out.println("---------------DONE---------------");
}
} |
Intellij Project Structure
Step 6: Run the application
Right click on AWSEC2Demo.java and select Run ‘AWSEC2Demo.main()’
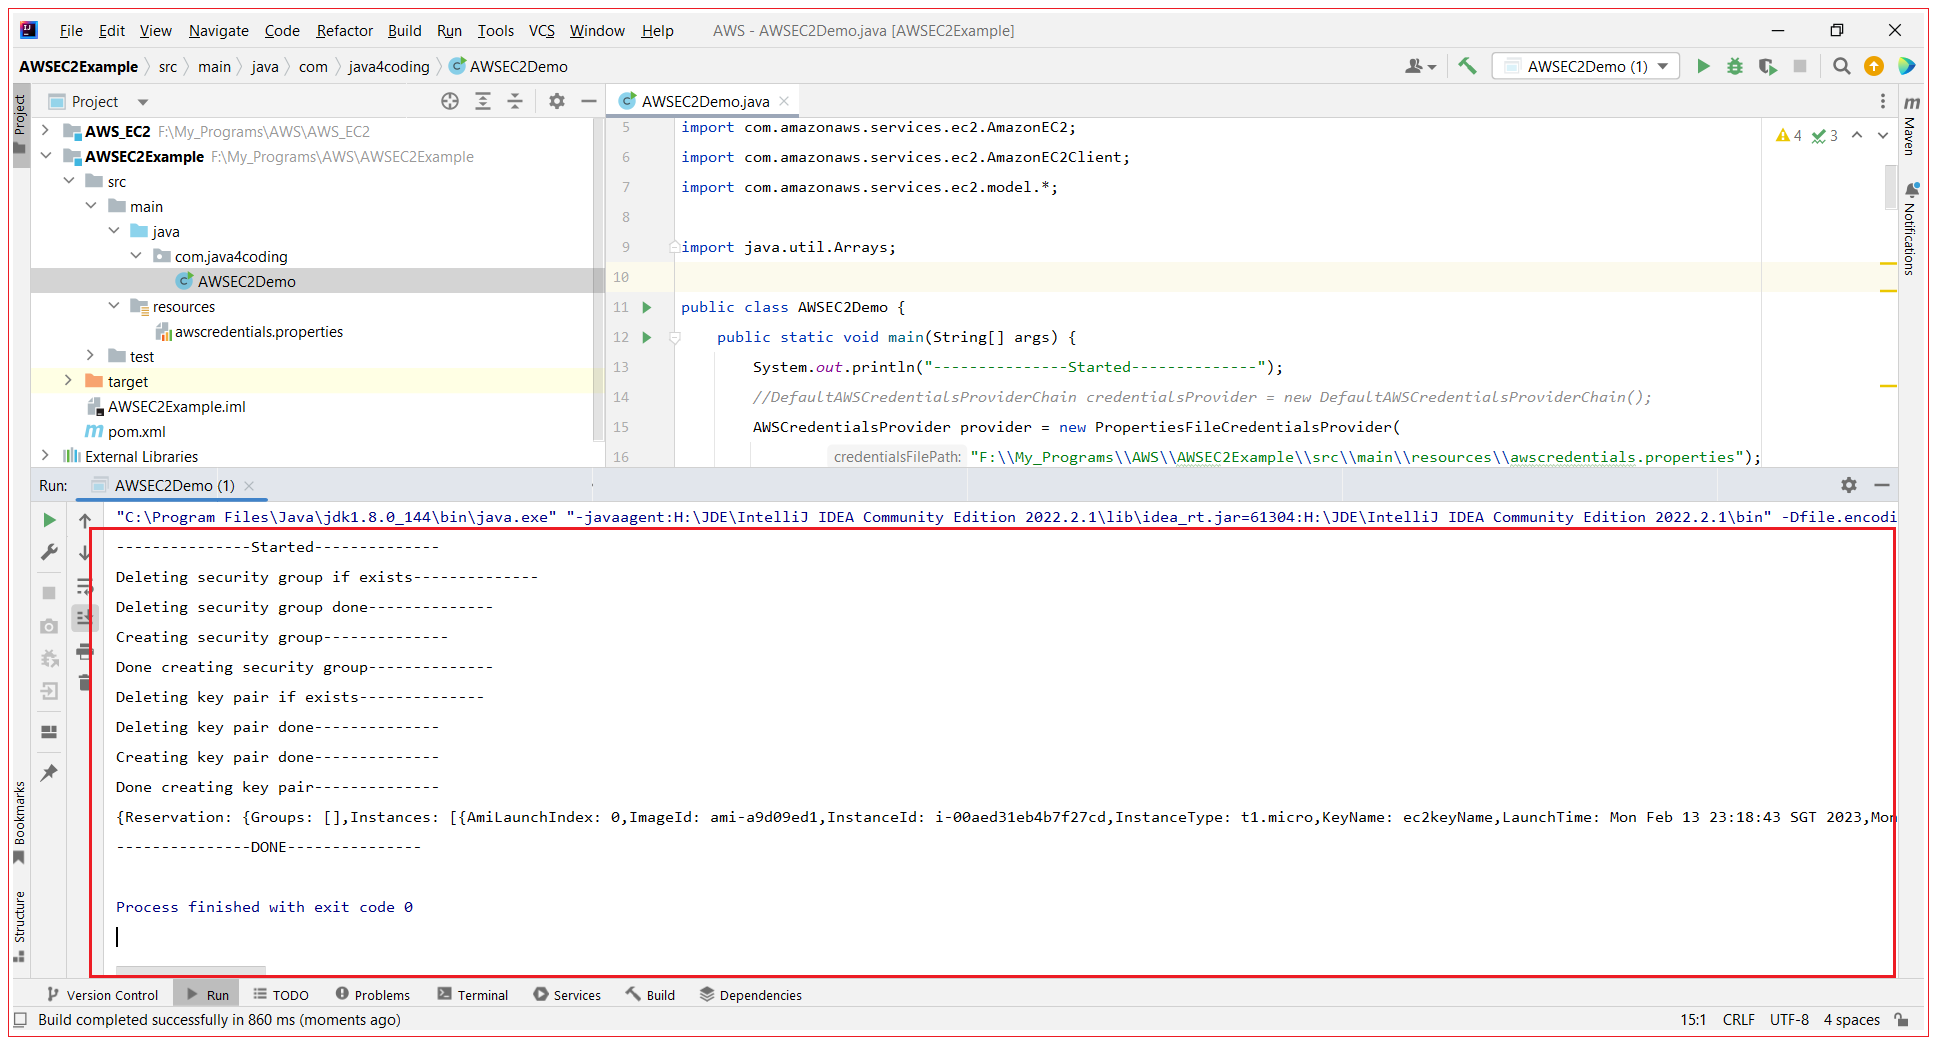
Step 6: Verify EC2 instance from AWS Console
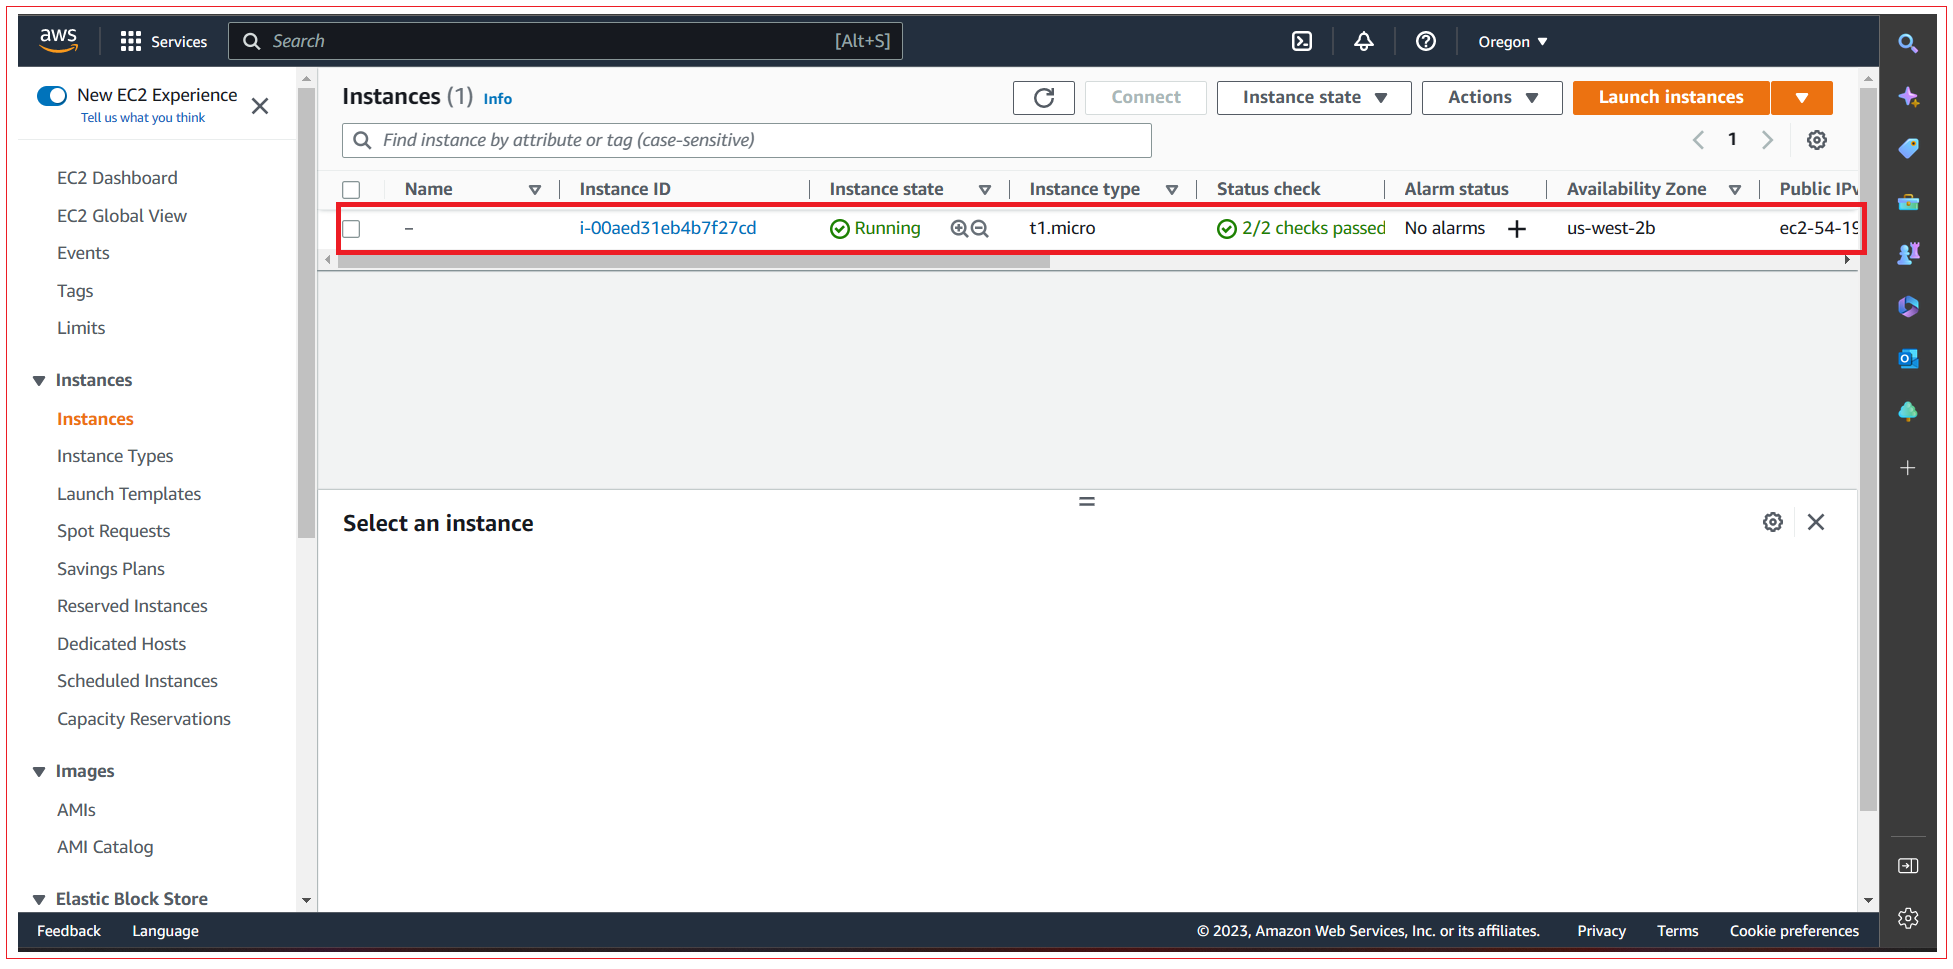
Login to AWS console and make sure you select the same region US_WEST_2 you have used in the program, otherwise you will not be able to see the EC2 instance you created from program.
Navigate EC2 console and you can see the EC2 instance created from the above example.
